How to Perform a Subcutaneous Peptide Injection Safely

An injectable peptide isn’t interchangeable with an oral dose. Digestion can alter a peptide, and swallowing it may not deliver the medicine as intended. A subcutaneous peptide injection technique places the medicine into the fatty layer beneath the skin, not the muscle. For a prescribed peptide, have a pharmacist or clinician demonstrate your first injection.
It’s understandable to want clear instructions before handling needles or preparing a dose. This guide outlines the equipment and steps involved in preparing and injecting a prescribed medicine, rotating injection sites and disposing of used sharps safely. Always follow the directions for your specific medicine, as permitted sites and instructions can differ.
Key Takeaways
- Learn why an injectable peptide’s route matters and why a prescribed product’s own instructions should guide how it is used.
- See which syringe and needle features are used for subcutaneous injections, and why a pharmacist or clinician should demonstrate your first one.
- Use a fresh injection point each time and keep a clear rotation pattern to help prevent scar tissue.
- Follow a simple preparation and injection sequence, from handwashing and site cleaning to steady delivery.
- Place used needles straight into a sharps container, and find out where Plumas SereneQ fits if you are considering that offering.
Injection-site rotation
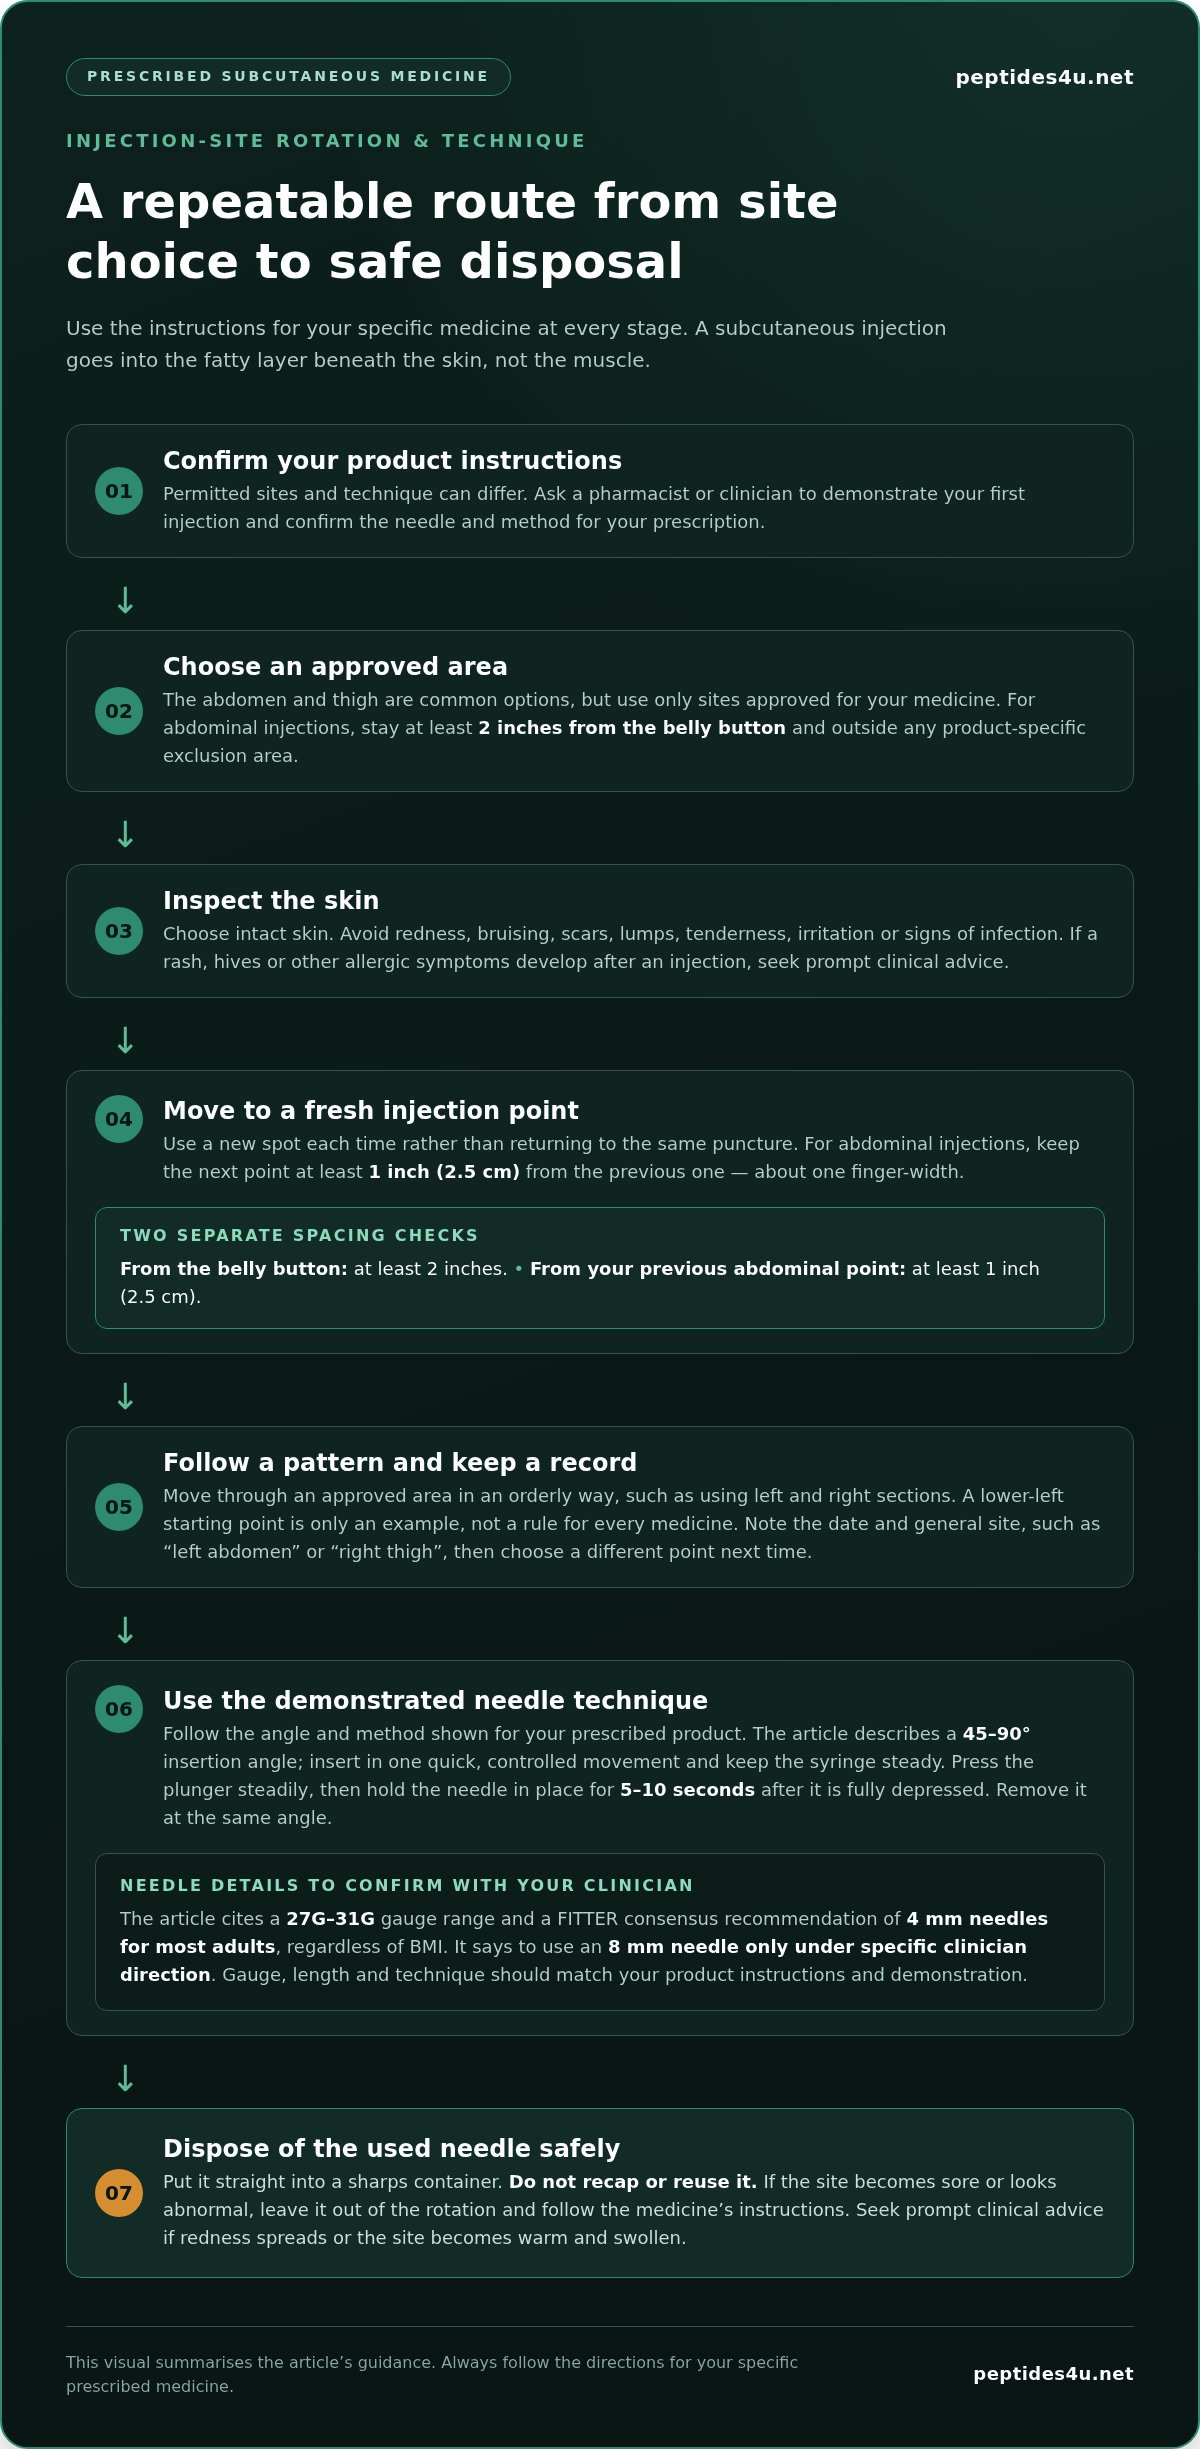
Rotate the injection site each time you use a prescribed subcutaneous medicine. Repeated injections in one small area can contribute to scar tissue and make the skin harder to use. A simple rotation pattern helps you keep track of injection sites and choose fresh, intact skin for the next dose.
Use only sites approved for your specific product. The abdomen and thigh are common options, but instructions differ between products. Keep abdominal injections at least 2 inches from the belly button, and avoid any product-specific exclusion area.
Watch this demonstration for a visual overview of preparation and injection:
- Choose an approved area. Check the product instructions before selecting your abdomen, thigh or another permitted site. One rotation example starts at the lower left abdomen. Treat this as a starting point, not a rule for every medicine. If the product excludes an area, follow its directions.
- Mark each injection point mentally or in a record. Move to a fresh spot every time, rather than returning to the same puncture. For abdominal injections, leave at least 1 inch (2.5cm) between the new point and the previous one. Another practical guide is to keep the next spot at least one finger-width away.
- Move around the area in an orderly pattern. For example, divide an approved abdominal area into left and right sections. Choose a new point within the current section before moving to the other side. Keep every point outside the area excluded around the belly button. A repeatable pattern makes it easier to track sites between doses.
- Inspect the skin before inserting the needle. Choose intact skin. Avoid redness, bruising, scars, lumps, tenderness or signs of infection. Don’t inject into irritated skin or an area that is reacting. If a rash, hives or other allergic symptoms develop after an injection, seek prompt clinical advice.
- Keep a rotation record. Note the date and general site, such as “left abdomen” or “right thigh”, then choose a different point next time. This helps prevent accidentally reusing one small area. If a site becomes sore or looks abnormal, leave it out of the rotation and follow the medicine’s instructions.
For subcutaneous peptide injections, keep the next injection spot at least one finger-width from the previous spot. This gives you a practical way to choose a fresh point. Use this spacing each time you move to another spot, and select only a site approved for the specific product.
Needle technique and pharmacist demonstration
Use the needle, angle and method specified for your prescribed peptide. Ask a pharmacist or clinician to demonstrate your first injection and explain the product instructions.
-
Pinching the skin
Gently pinch a fold of skin at the selected site to lift the fatty layer away from the muscle beneath it. Hold the fold steady without squeezing hard. Before proceeding, check that the skin is intact and free from redness, bruising, scars or lumps. Do not inject into an area that feels tender or looks irritated.
-
Inserting the needle
Hold the syringe as shown during your demonstration, then insert the needle in one quick, controlled movement. This can be more comfortable than pushing it slowly through the skin. Keep your hand steady once the needle is in place. Do not change direction or inject into a site that has become sore since the previous injection.
-
Using the correct needle angle and depth
Follow the product instructions and the angle demonstrated by your pharmacist or clinician. Subcutaneous needles are inserted at 45-90 degrees. A 45-degree angle may suit adults with less fatty tissue; 90 degrees may suit an adequate fatty layer. The FITTER international consensus recommends 4mm needles for most adults, regardless of BMI. Use 8mm needles only under specific clinician direction.
-
Getting a first-injection demonstration
Before your first prescribed injection, ask a pharmacist or clinician to demonstrate the full technique. Have them show the correct needle, angle, skin fold and plunger action for your product. Practise the hand position under their guidance, and ask them to clarify any step that feels unclear, including how to keep the needle still while administering the dose.
-
Completing the injection
Press the plunger steadily, then hold the needle in place for 5-10 seconds after it is fully depressed. Remove it at the same angle used for insertion. Put the used needle straight into a sharps container. Do not recap or reuse it. If redness spreads, or the site becomes warm and swollen, seek prompt clinical advice.
For readers looking for peptide products, high-quality vials are available from Peptides4u.
For a more comfortable subcutaneous injection, insert the needle into the skin quickly rather than slowly. Rather than advancing it gradually, use one quick, controlled movement and avoid shifting its direction once it is in place. Insert the needle all the way into the skin and keep it still while pressing down the plunger. A pharmacist or clinician can observe this sequence and clarify hand position before you administer your prescribed dose. Keep the demonstration focused on the product and the technique specified for it.
Peptide medications should be administered subcutaneously at approximately 0.5 inch depth, not intramuscularly. For subcutaneous peptide injections, the needle-gauge range is 27G to 31G. Gauge and depth are separate details to check against the product’s instructions. Ask the pharmacist or clinician to confirm that the chosen needle and demonstrated method match your prescription, and raise any uncertainty before proceeding.
What Are Injectable Peptides – and Why Can’t You Just Take Them Orally?
There is no single UK answer for every unlicensed peptide injection. Status depends on the substance, product authorisation and supply; the term “unlicensed” alone does not establish that a product is lawful or suitable. Some peptide medicines are designed for subcutaneous use, but evidence relates to the specific medicine and route, not every peptide.
- Wash your hands before preparing the syringe. Use soap and warm water, rubbing your hands together for at least 20 seconds. Dry them with a clean towel or tissue. This reduces the chance of transferring germs to the syringe, needle or skin during preparation.
- Clean the chosen injection site. Use an alcohol pad as directed for your medicine, then let the skin dry before inserting the needle. Don’t blow on the area or touch it after cleaning. If you do touch the cleaned skin, prepare it again with a fresh pad.
- Inspect the skin before each injection. Choose intact skin at an approved site. Avoid redness, bruising, scars, lumps, tenderness or signs of infection. Check the product instructions for excluded sites. Don’t inject into an area that looks irritated or feels sore.
- Keep the injection area clean during delivery. Follow the prescribed steps and keep the syringe steady. Press the plunger as instructed, without touching the needle or cleaned skin. After withdrawing the needle, use clean gauze if needed. Don’t rub the area, as this can irritate the tissue.
- Watch for changes after the injection. A small raised wheal can settle within 30 to 60 minutes. Seek clinical advice for spreading redness beyond 5 cm, especially with warmth or swelling. A growing, firm, tender nodule lasting beyond 72 hours also needs attention. Contact a healthcare professional for severe or persistent injection-site pain lasting more than 24 hours.
- Respond promptly to serious symptoms. Expanding redness, warmth, drainage, severe pain, a persistent hard lump, hives or fever after an injection call for prompt clinical advice. A fever of 100.4 °F or higher warrants contacting a healthcare provider. Facial swelling or breathing trouble is an emergency.
- Understand why oral use differs. Peptides are chains of amino acids, and digestion can break them down before they reach the bloodstream. An oral dose may therefore not deliver a medicine as intended. Use the route specified for the particular prescribed product, and don’t assume an injectable peptide can be taken by mouth.
Equipment for subcutaneous peptide injections
Store and prepare the medicine according to its product instructions. Reconstituted peptides are commonly refrigerated at 2-8 °C; the stated storage period is 3-4 weeks, but the product’s directions determine handling and use after mixing.
- Choose the syringe specified for the prescribed dose. U-100 insulin syringes are used for subcutaneous peptide administration. They are calibrated to 100 units per ml, so the markings indicate volume, not a dose that suits every medicine. Syringes may hold 0.5 mL or 1 mL; use the capacity and measurement instructions given for your prescribed product. Don’t estimate a dose from another vial’s concentration.
- Match the needle to the instructions. A commonly recommended insulin syringe needle is 29-31 gauge. A finer gauge has a smaller diameter, but the correct needle depends on the product and the demonstrated method. Keep the needle sterile until use. Don’t substitute a different needle or syringe simply because it looks similar.
- Set out preparation and cleaning supplies. Gather the prescribed medicine, the correct syringe, an alcohol pad and clean gauze before starting. If the product requires reconstitution, use only the diluent and preparation method stated in its instructions. A 5 mg vial may be described with a 1-2 mL reconstitution volume in some guidance, but that is not a universal instruction. Never guess the diluent or volume.
- Prepare a suitable sharps container. Place it within reach before administration so you can dispose of the used needle immediately. Use a proper sharps container rather than leaving a needle on a surface or putting it loose into household waste. Keep the container stable and away from children while preparing the syringe.
- Check the site and supporting supplies. Select an injection area approved for that product, such as the abdomen or, when permitted, the upper arm. Keep abdominal injections at least 2 inches from the belly button. Have gauze ready for a small spot of bleeding. If swelling, redness or a tender lump appears, don’t use that point for the next injection.
- Read the syringe before pushing the plunger. Confirm the prescribed amount against the medicine’s own instructions and syringe scale. U-100 markings relate to volume; they do not establish the correct dose without the product concentration. If the label, syringe scale and instructions don’t align, stop preparation and seek guidance from a pharmacist or clinician.
How do you safely give a prescribed subcutaneous injection step by step?
Follow the instructions for your specific prescribed product, including its dose and approved sites. Use this sequence to organise preparation, injection and disposal.
- Read the product instructions first. Confirm the prescribed dose, route, injection sites and any preparation directions. Products can differ, so don’t use a dose conversion or mixing method from another peptide. If the label and syringe markings don’t match, pause and seek guidance from a pharmacist or clinician.
- Prepare a clean work area. Set out the medicine, correct syringe, alcohol pad, gauze and sharps container before starting. Wash your hands with soap and warm water for at least 20 seconds. Dry them with a clean towel, then avoid touching the needle or syringe tip.
- Choose an approved injection site. The abdomen and thigh are common sites, but follow the directions for your product. For an abdominal injection, stay at least 2 inches from the belly button. On the outer thigh, use the area between one hand above the knee and one hand below the groin.
- Inspect and clean the skin. Select intact skin, away from redness, bruising, scars, lumps, tenderness or infection. Clean the chosen point with an alcohol pad and let it air-dry for at least 10 to 15 seconds. Don’t inject through damp skin or touch the cleaned spot again.
- Measure only the prescribed amount. Prepare the syringe using the product’s own instructions and check its markings before injecting. A U-100 syringe measures volume in units, not the correct dose for every concentration. Don’t estimate or change the dose to fit a syringe.
- Pinch and insert as demonstrated. Lift a skin fold measuring 1 to 2 inches, then insert the needle at the product-appropriate angle. Subcutaneous needles are inserted at 45-90 degrees. The angle depends on the needle and the fatty layer. Keep your hand steady whilst inserting.
- Deliver the medicine steadily. Press the plunger slowly, following the demonstrated method. For a prescribed volume of 0.1-0.3 ml, one guide describes delivery over approximately 5 to 10 seconds. After fully depressing the plunger, hold the needle in place for 5-10 seconds.
- Withdraw and dispose of the needle. Remove it at the same angle used for insertion. Wipe the area with gauze; apply gentle pressure for minor bleeding, without rubbing. Put the needle straight into the sharps container. Explore peptide products if you’re considering an option after learning the safe administration steps.
Peptides4u: Plumas SereneQ
Peptides4u offers Plumas SereneQ for readers exploring its peptide products. Consider it only after understanding that product instructions, approved use and prescribed administration must guide any medicine-related decision. Safe injection steps matter, but they don’t establish whether a particular product is appropriate for you. Plumas SereneQ is the relevant Peptides4u offering to explore if you’re considering this option. Keep product information separate from clinical advice, and follow the directions for any prescribed medicine you use. For product details, visit peptides4u.net.
Make your next step a considered one
Let the instructions for your prescribed medicine guide each decision. The next step is to understand what you are considering, how it fits your needs and where to find product information. Subcutaneous peptide injection technique is one part of safe use, not a substitute for product-specific directions or clinical advice.
Peptides4u offers Plumas SereneQ and Viales Quanta Pharma. If you are exploring these offerings, take time to review their product information and distinguish product enquiries from questions about treatment. Peptides4u does not provide medical consultations or prescriptions, so speak with a healthcare professional about diagnosis, suitability or medicine use.
For questions about Peptides4u’s offerings, contact Peptides4u with your questions. Take the next step at your own pace, with clear information and the right support for the decision ahead.
Frequently Asked Questions
What is a subcutaneous injection?
A subcutaneous injection delivers medicine into the fatty layer beneath the skin, above the muscle. Subcutaneous peptide injection technique uses this route rather than placing medicine into muscle tissue. The prescribed route matters because a medicine’s formulation and instructions are designed for a specific method. Don’t change an oral, intramuscular or other medicine to a subcutaneous injection without specific product directions.
Where are the recommended subcutaneous injection sites and how should sites be rotated?
Common sites include the abdomen and thigh, but the product instructions determine which areas are suitable. Some products also allow the back of the upper arm, often when another person gives the injection. Keep a simple written record, such as “left abdomen” followed by “right abdomen”, and use a fresh point each time. Avoid skin that is bruised, scarred, tender, lumpy or irritated.
What needle size and syringe are used for subcutaneous injections in adults?
Needle choice depends on the prescribed product and the injection method demonstrated. Guidance commonly describes insulin syringes with 29-31 gauge needles; a U-100 syringe is calibrated to 100 units per millilitre. The FITTER international consensus recommends 4 mm needles for most adults, regardless of BMI. Syringe capacity can be 0.5 mL or 1 mL. Match the equipment and scale to the product instructions.
What are the risks and side effects of subcutaneous injections, and when should you seek medical help?
A small raised wheal may appear and commonly resolves within 30 to 60 minutes. Get clinical advice for spreading redness, warmth, drainage, severe pain or a growing, firm lump. Hives can signal an allergic reaction. Fever after an injection also warrants medical advice. Facial swelling or breathing trouble is an emergency. Don’t inject into a site that remains painful, swollen or visibly inflamed.
What should you do if you inject the wrong dose or have a reaction?
If you think you injected the wrong amount, don’t guess at a replacement dose or change the next dose yourself. Contact the prescribing healthcare professional promptly and tell them the product name, intended dose, amount taken and time of injection. For a reaction, describe the symptoms and when they began. Facial swelling or difficulty breathing requires emergency help, not routine follow-up.
How can a UK pharmacist or clinician teach subcutaneous injection technique?
A pharmacist or clinician can demonstrate the subcutaneous peptide injection technique for your prescribed product before your first injection. Ask them to show you how to handle its syringe, choose an approved site, position the needle and dispose of it afterwards. Then explain the steps back in your own words so they can correct any misunderstandings before you prepare or administer the medicine independently.